Plant your own ingredients for a fresh, homemade salsa
Salsa-lovers can tailor homemade recipes to any taste by growing their own ingredients, which is easy since the plants needed for a "salsa garden" grow well throughout most of the United States and beyond.
Five main ingredients are used in a typical, chopped, tomato-based, Mexican-style pico de gallo salsa – hot peppers, onions, garlic, cilantro, and of course, tomatoes. Recipes abound, most of them using variable amounts of those crops with ingredients such as vinegar, salt, lime juice and/or oregano to finish off the creation.
One of the advantages of growing your own – besides the freshness and money-savings – is that the flavor can be tweaked to suit your fancy depending on which specific variety of vegetables you choose.
- Like it sweet? Pick a sweet tomato, such as a cherry-type tomato or an heirloom favorite.
- Like it less watery? Go with a plum-type tomato.
- Like it hot? Bump up the heat with a super-hot pepper and lots of them.
- Like it mild? Tame it by using fewer and milder hot peppers or substituting sweet bell peppers for some or all of the hot ones.
No one salsa fits all tastes, so experiment both with your recipes and your plant varieties until you hit personal perfection.
Your salsa garden can be its own dedicated space for growing the five main ingredients in one space, or the ingredients can be rolled into a larger vegetable garden. Either way, pick a sunny and well drained location with rich, loose soil.
Here’s how to grow each of the ingredients:
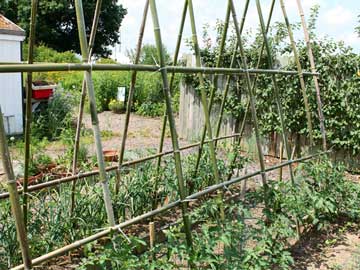 One way to support tomatoes is to grow them up fencing. This is a teepee-style fencing made out of bamboo.
© George Weigel
Tomatoes
These are warm-weather crops, so wait until after all danger of frost passes to plant your plants in the ground. Give tomatoes plenty of space – 2 to 3 feet apart is good – and give them support since they grow 4 to 6 feet tall or more. Some gardeners tie vines to stakes, others grow them inside cages, and still others weave them up fencing with wide openings. Keep the plants consistently damp all season, but water the ground and not over the plant leaves to discourage disease. Scratch a granular tomato fertilizer into the soil before planting, then scatter booster applications every 4 to 6 weeks throughout the season because tomatoes are heavy feeders.
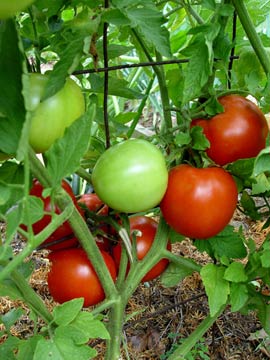 Tomatoes are a key home-grown ingredient of salsa. These are 'Big Beef' ripening on the vine.
© George Weigel
The main threats are several leaf diseases, which can be controlled by starting with disease-resistant varieties in the first place, by mulching with clean straw, and by spraying fungicides at the first sign of leaf damage.
- For the least watery salsa, try plum- or paste-type tomatoes, such as 'San Marzano,' 'Amish Paste' or 'La Roma.'
- For top flavor, experiment with heirloom types, such as 'Brandywine,' 'Cherokee Purple' or 'Mortgage Lifter'
- For ease of growth and best yields, try mid-sized hybrids, such as 'Big Beef,' 'Celebrity' or 'Beefsteak'
- And for green salsa verde, try 'Green Zebra' or tomatillos, which produce green pea-sized fruits inside of husks.
Peppers
Pepper care is similar to tomatoes, except these grow on shorter plants (typically 18 to 24 inches tall) and don’t need the heftier support of tomatoes. A short stake with ties is usually plenty, if even that. Plant outside after frost, and fertilize with GreenView Tomato and Vegetable Food with the same frequency as tomatoes – every 4 to 6 weeks. Peppers are less likely to run into disease problems, so spraying usually is not needed.
Just as tomatoes turn color when they ripen, most peppers also turn from immature green to shades of red, orange, gold or chocolately purple as they ripen. They can be picked at any stage, however, depending on the flavor you’re after. Hot, dry weather and full ripeness generally yield the hottest hot peppers, although a bigger factor is the variety you choose in the first place.
If you like your salsa boiling hot, choose types that have the highest Scoville ratings, which is a measure of hot peppers’ heat. Some of the hottest are 'Habanero,' 'Scotch Bonnet' and 'Devil’s Tongue.'
To tone down the heat, use fewer hot peppers or switch to mid-Scoville types, such as 'Nu Mex,' 'Jalapeno' and 'Serrano.'
Milder hot peppers include 'Hungarian Hot Wax,' 'Poblano,' 'Anaheim' and 'Cubanelle.' Or experiment with varying amounts of one of the many no-heat sweet bell peppers.
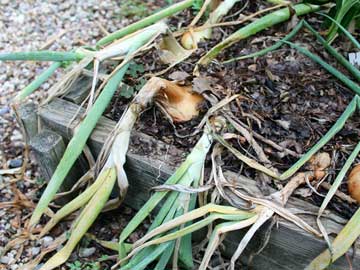 Onions are ready to harvest when the leaves flop over.
© George Weigel
Onions
Unlike tomatoes and peppers, onions are cool-season crops that have a longer growing season and a preference for cooler weather. Most people grow these by planting “onion sets,” which are small onions that are inserted just under the soil surface in mid to late winter in warmer parts of the United States and very early spring in cooler areas. Onions also can be started inside from seed over winter to produce young plants in cooler areas, or planted directly in the garden outside the fall before in warmer areas.
Fertilize them at planting with GreenView Tomato and Vegetable Food and again every 4 to 6 weeks until the leaves brown and flop, which is your cue that they’re ready to pick.
Dry them and store them in a cool area until the tomatoes and peppers are ready for salsa-making. Some onion varieties are sweeter than others, and some store longer than others, but you won’t go too wrong by picking varieties that are available from local sources.
Garlic
Garlic looks and grows like onions, but a main difference is that the cloves are planted the fall before the season of harvest. In cooler parts of the country, plant garlic cloves 2 to 3 inches deep and 6 to 8 inches apart in October. They’ll usually push up a few shoots, but the plants will go dormant over winter and begin growing again in spring. Cover the planting with a light layer of straw or leaves after the leaves brown in fall.
In warmer parts of the country, plant garlic cloves in November or even December. Fertilize at planting with GreenView Tomato and Vegetable Food and again as the temperatures warm in spring and every 4 to 6 weeks until the bulbs begin to swell. Then no additional fertilizer is needed. Water when the soil is dry. Gently lift the plants when the lower leaves turn brown. Unlike onions, don’t wait until the entire stalk is brown.
You’ll find all sorts of so-called "gourmet garlic" varieties in catalogs these days, but garlic basically comes in two main types.
- Softneck types have the strongest flavor and keep longer, but they tend to do best in warm-weather areas.
- Hardneck types are somewhat milder in flavor but more cold-hardy and so are generally better choices in cool areas.
Cilantro
Here’s a plant with two different names and two different uses. When you use the BB-sized seed pods as a seasoning, it’s called coriander. When you snip the leaves for salsa and chili, it’s called cilantro. Either way, the plant ifs easy to grow from seed directly planted in the soil. Cilantro can tolerate light frosts, so it can be planted in fall or winter in warmer areas. In cooler areas, plant seed about a month before the last frost.
For ongoing harvest, plant seeds every 2 or 3 weeks apart. Then snip off leaf stalks as you need them throughout the season. Cilantro usually reseeds itself if you don’t remove the coriander seed pods before they mature, dry and drop. Snip off maturing seeds or flowers if you don’t want that to happen; let the seeds drop, and thin out the excess if you do. Cilantro is a fairly light feeder, so scratching an application of Natural Start by GreenView All-Purpose Plant Food or Natural Start by GreenView Tomato, Vegetable and Herb Food at planting is usually sufficient.