Gardening’s biggest reward is arguably the season’s first red, ripe tomato. That can’t come soon enough for gardeners eager to be the neighborhood’s first with a ripe fruit. With a bit of planning and some cold-protection strategy, tomatoes can be ready weeks and even months ahead of the norm.
Go Ahead — Start from Seed
Figure on growing your own plants from seed. You’ll need substantial plants long before they’re readily available at the garden center. A good target date for transplant-ready tomato plants is 6 weeks ahead of the usual last-frost date. In Zone 6, for example, that means planting out at the beginning of April instead of mid-May.
To have plants ready by then, take into account a week to 10 days to germinate the seed, 8 to 10 weeks of indoor grow time, and 7 to 10 days of transition between inside and out. In other words, you’ll need 10 to 12 weeks of indoor lead time. In Zone 6, that means starting seeds in early to mid-January. In warmer climates, it means December. This early start makes sense in the South not only to speed up that first tomato but to have crops producing before hot summer weather shuts down fruit production.
Variety Matters
To speed ripening, go with tomato varieties that have the shortest maturity times. These estimates are listed on seed packs and in seed catalogs. The fastest maturers are typically small-fruited bush or “determinate” types (they ripen all at once instead of continually producing) and cherry or grape types. Some can sprout and bear ripe fruit in less than 2 months.
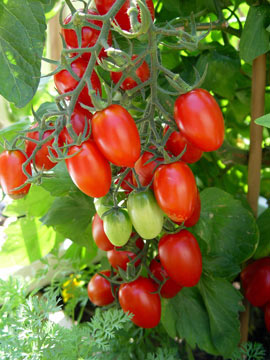
 Cherry and grape tomatoes are some of the earliest types to ripen.
© George Weigel
Not all of these are the best-tasting varieties, but at least most are better than what’s available at the grocery store. Go ahead and start a few mid-season or later varieties in addition to early ones for a staggered arrival to the main-season harvest.
Some reasonably good-tasting early varieties to try: ‘Bush Early Girl’ (45 days); ‘Early Girl’ (50-52 days); ‘Siletz,’ ‘Pixie’ and ‘Golden San Marzano’ (52 days); ‘Early Doll,’ ‘Early Wonder,’ ‘Bloody Butcher,’ ‘Alaskan Fancy’ and ‘Red Alert’ (55 days), and ‘Small Fry VFN,’ ‘Tiny Tim,’ ‘Glacier’ and ‘Stupice’ (55 to 60 days).
Some good cherry and grape types that ripen in 55 to 60 days: ‘Sungold,’ ‘Sweet Million,’ ‘Juliet,’ ‘Terrenzo,’ ‘Gold Nugget,’ ‘Tomatoberry’ and ‘Jolly Elf.’
The Inside Part
Germinate tomato seeds in vermiculite or a light-weight seed-starting mix at 75 to 80 degrees. Once the plants put out their first set of true leaves, transplant them to 4- or 6-inch pots filled with a light-weight potting mix.
A sunny window is passable for indoor growing, but tomatoes will be stockier under supplemental light. Fluorescent workshop lights are good, but “grow” lights with a spectrum more akin to sunlight are even better.
Give the young plants a minimum of 10 hours of light per day and a maximum of 14 hours. Temperatures between 60 and 70 degrees are ideal, and 55 is the minimum.
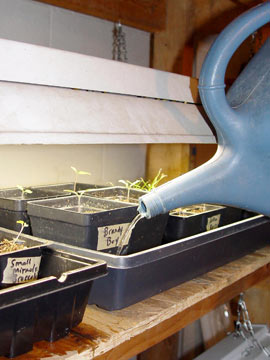
 Add water to the tray and let the soil absorb it rather than watering young transplants over the top.
© George Weigel
Set the plant pots in a tray and add water to the tray every few days or when the soil begins to dry. This “bottom watering” is better than disturbing roots by watering over the top. Add enough water so the potting mix is damp to the touch in about 15 minutes. Dump any excess so the plants aren’t in standing water.
Run a fan on low to ward off disease and encourage stocky growth.
After about 6 weeks, repot the growing plants into 8- to 10-inch pots. Your plants might start producing blossoms toward the end of the indoor time. Encourage fruit set by gently shaking the flowers daily, especially from late morning through early afternoon.
The Move Outside
About 7 or 8 weeks ahead of the last frost, acclimate your indoor plants to the outside. Give them increasing amounts of light and wind exposure daily over a 7- to 10-day period, but never let them outside in freezing or near-freezing temperatures.
A good spot is along a south-facing wall. Another is protected by a cold frame with an adjustable lid. At the same time, prepare your garden bed. This is where raised beds shine since they drain better and warm sooner than in-ground gardens. Hold off digging soil that’s soggy.
First, scratch in a granular fertilizer. A first application is recommended when seedlings are transplanted. Then warm the soil.
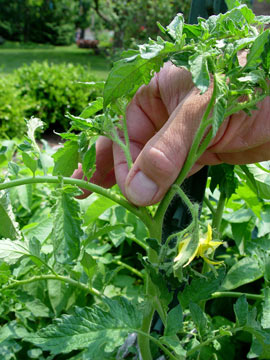
 Pinching off side shoots or “suckers” speeds the ripening of fruits that already have set.
© George Weigel
One option is to lay clear plastic across the soil surface. Cover it later with straw or chopped leaves when the weather warms. Water-filled plastic milk or water jugs, glass cloches and floating row covers are other plant-warming choices.
About 4-6 weeks later — once the last frost date passes, remove the protection and side-dress around each plant with a second application of fertilizer.
To encourage even faster ripening, pinch off side shoots or “suckers” once the main shoots begin setting fruits.
Keep your plants watered (drip irrigation and soaker hoses are better than watering over the top), and within a matter of weeks, those little green fruits should mature weeks ahead of schedule. Bragging rights are yours.