Tomatoes are the rock stars of home vegetable gardens. According to the National Gardening Association, more than 85% of home gardeners grow them each season. Right about now, you might be seeing some not so pretty issues on your own crop. What are some of the more common problems and what can you do to fix them?
 Blossom end rot.
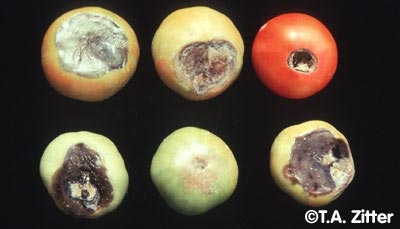
© T.A. Zitter
It's not unusual to see sunken, dark spots where the blossom was. It's called Blossom End Rot and it's super easy to fix. First, the cause: not enough calcium is getting to the tomato for one of two reasons. There either isn't enough in the soil or your watering practices aren't delivering it properly to the plant. Test the soil first to ensure the pH is 6.5-6.8 which will free up whatever calcium is in the soil. If that's OK, then add a fertilizer specially formulated for tomatoes. As for irrigation, ensure your plants get about 1 to 1 1/2 inches of water a week including rain while fruiting. Mulch will help keep the soil evenly moist in between watering. And a rain gauge will help you keep track of what Mother Nature is contributing.
 Septoria leaf spot
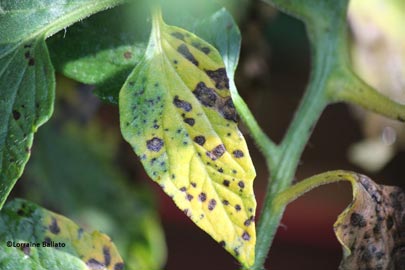
Leaf spot diseases are also common issues, specifically Septoria leaf spot. The yellowing foliage is hard to miss. This is a soil-borne fungal disease that only goes after tomato leaves and stems. The spots have a dark brown edge with a white or gray center. As the disease develops and more leaf spots develop, the surrounding area turns yellow and the leaves wither and die. The disease spreads from the bottom up.
The Septoria leaf spot fungus overwinters on infected tomato debris or on weeds in the nightshade family, the same family to which tomatoes belong. The fungus can also survive on garden gear such as cages and stakes just waiting for the right conditions to reinoculate plants each season. If the pathogen is resident in your garden, it just needs high humidity, temperatures of 60–80 degrees F and leaf wetness to develop and spread.
So now that you've got it, what can you do?
Make sure your plants are staked or caged to keep them off the ground. That will improve air circulation and prevent water splashing and spreading the pathogen. Water early in the day at the base of the plant to keep the foliage as dry as possible and let it dry before nightfall. If you haven't already, mulch around the base of your plants to reduce splash-up. Those fungal spores may be present and be spread each time you water or it rains.
Remove the lower infected leaves, being careful not to expose any shaded fruit to the sun and cause sunscald on it. If you use any tool like a clipper to do this, disinfect that clipper so you don't spread the disease unwittingly. Those leaves go in the trash. At the end of the season, all diseased plants get trashed.
You can also use fungicidal sprays labeled to control the disease, however, be aware that those products will only protect the new foliage. They will not cure leaves that are already infected. You must follow the directions on the label especially since you are dealing with food.
You can prevent Septoria leaf spot from even happening by taking several steps. At the end of this season, be extra careful about cleaning up the garden to get rid of any spores. Remove any tomato refuse to the trash and disinfect all your tomato cages and stakes to kill the spores.
Crop rotation is next on your list. When you plan next year's garden, try to make sure it applies to the entire nightshade family: tomatoes, peppers, eggplant, and potatoes. Don't put any of them in the same place they were for three years if you can. Some gardeners use a clockwise plan to make it easy to move things around. All you need is 3-4 separate areas. A third step is to ensure you have the best sun and air circulation possible for your plants to improve drying and prevent moisture buildup, depriving fungal spores of their ideal conditions. You can limb up some trees, space your plants further apart, use more vertical growing techniques, etc. They all work.
And of course, you can start testing your soil now for next spring. That way you can add amendments in the fall in preparation for next year and you won't have any of these issues.
by Lorraine Ballato, Garden writer and author